Dear Friends,
In the spirit of Thanksgiving, I had the bright (read: crazy) idea to create twelve paper mache cornucopias to give to my family members.
I thought, 'My cousin, Matt, taught me how to make pinatas this
way.
How hard could a 'horn of plenty' be?'
Plenty hard.
First, you purchase poster board in fall colors. Not the florescent green 'come to our car wash' variety. We're going for a tad more class and I have serious nightmares about going out in public in a bikini. We wouldn't want those to surface during our project. Now would we?
Shape the poster board into a cone shape.
Be sure to juggle the cone and the roll of clear tape while trying to tape the paper in place. This is great entertainment for your children. If you don't have children, it is still a good exercise. Life is a juggling act, after all.
Flatten the narrow end.
Curl the narrow end up to create the cornucopia's proper shape.
My kitchen houses a large collection of cooking magazines that I rarely open. I pored over them when they arrived in my mailbox but they are only gathering dust now. I have been trying to think of something to do with them besides toss them in the recycling.
Add a small bottle of glue to some warm water and mix well. Avoid eye contact with your husband because he is thinking you are crazy, right about now.
Dip the paper scraps in the water and cover the entire outside of the cornucopia with them.
Overlap and arrange however you decide. Bee helped with this part.
Personally, I enjoyed the little glimpses of things I like. Food, people, and lots and lots of words.
Take this guy, for instance. He is happy. He is getting married. I have no idea who he is, but I like him.
I really need that cup of coffee. Please? Somebody?
And here is half a piggie cupcake. Pigs always remind me of my sister, Dee.
Hold on a second, that's not an insult. Pigs are her favorite animal.
Always have been.
Hey! batter, batter, batter! This little kiddly-wink is doing it right. She's taking life by the beaters. One lick at a time. With both hands. Cookies! Who needs 'em?
A pecan frosted cake, a Strawberry torte and a covered bridge? [Sigh] If I'm dreaming don't wake me up. [munch, crackle, gag] Uggg, for the record, paper mache tastes nasty.
"Horn of plenty needs time a-plenty."
Trim any scraps that are sticking over the edge. Now don't you go over the edge, we're almost done.
Using a bronze ink pad, lightly swipe ink over the surface of the cornucopia. It gives it kind of an aged look. And that's good when you are not a person.
Ahhhhhh! Nothing like fresh-aged raspberries. I do love a good oxymoron.
Sand some of the paint off.
This gives the cornucopia a nice distressed patina. Ha! Patina! I love pretending I know what I'm talking about. Really, I just fly by the seat of my pants, making it up as I go. Sometimes it works. And sometimes it don't.
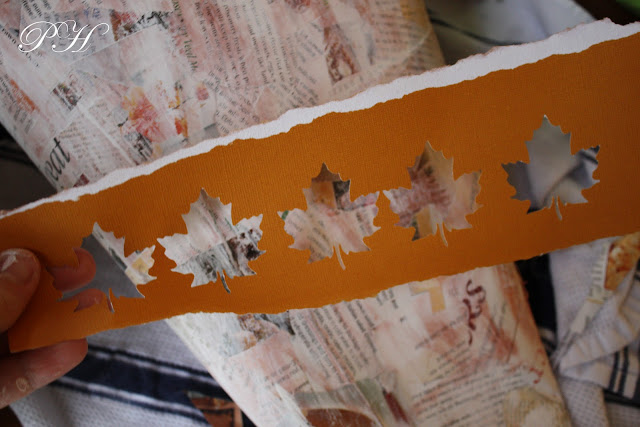
Tear Autumn leaf-colored cardstock into strips.
Dip one of the strips in the 'glue-y' water.
Attach the strip to the tail end and add a row of leaf shapes around top.
I also monogrammed it for extra 'Ummph'.
Alright, alright.
Truth be told they weren't hard to make.
I had fun. Okay? There I said it.
Now let me go back to my wallowing and mucking about in self pity-- I mean, 'glue-y' water.
Love,
I also monogrammed it for extra 'Ummph'.
And, there it is, all done.
I hope my family likes them. They better.
I'm not gonna 'mache' my fingers to the bone for nothin'.
I'm not gonna 'mache' my fingers to the bone for nothin'.
Alright, alright.
Truth be told they weren't hard to make.
I had fun. Okay? There I said it.
Now let me go back to my wallowing and mucking about in self pity-- I mean, 'glue-y' water.
Love,
Rae


They better like them, if they don't you can always use them as weapons.
ReplyDeleteIf they don't like them...send them my way...super cool.
ReplyDeleteNo, I bet they will think they are the neatest. however they do look like a lot of work...and here I thought I was half way creative. You go girl!
hey girl o mine, I did not expect to get a sneak preview let alone a step by step guide of them! Wow, this should make us all really appreciate them eh? They look wonderful.
ReplyDeleteI especially love the punched leaf part. Where did you get that punch? I WANT one for the pages I will do of our NY/VT trip--It would be perfect!
Really really cool! and what a great art lesson you gave along with it!
ReplyDeleteHow cool!!!
ReplyDeleteI think they are beautiful!(How yummy they will be when they are FULL of gifts too)
ReplyDeleteSee you soon. -Kit-Kat
I hereby dub you Queen Creativity. That is amazing. You should see the turkeys I tried to make out of construction paper tonight with the boys. They turned out... well... a little strange.
ReplyDelete