
886?!
How did I take that many pictures over the holidays?
And now what am I going to do with them?
I hate to see them hang out on my computer only to show up when my screen-saver slide show cycles through the million and a half shots housed on the thing. I love to scrapbook but I'm years behind now after 3 kids and I haven't scrapbooked the last 4 or 5 sets of December holidays so who knows when 2011's set will get done. I could hang them on the wall but 886 frames might be a bit excessive.
I took some pictures I really love this year.
I want them to be special and accessible.
What to do? What to do....
I wonder if this is you too...
Here's what I came up with:

"Break out the craft supplies, girls!"

Supplies:
- 2 10X12 Matching Christmas Gift bags (grab them now out of the clearance bin)
- Matching tissue paper
- Paper tags
- Striped yarn or bakers twine
- Medium weight cardboard
- 7 paper treat-bags
- White and Kraft-brown cardstock
- A Christmas scrapbooking page kit (or several co-ordinating papers and stickers)
- 3 large book rings
Tools:
- Paper cutter
- Scissors
- Sewing Machine
- Hole punch
- Personalization stamp (optional)
- Strong adhesive


Instructions:
- Lay 2 gift bags back to back. These are the front and back cover and you want the design to face outward on both. The side with the bottom folded up should be facing in.
- Cut the knots off of the ends of the handles. Remove the handle on the side that faces inside the album. There should be two handles left, one on the outside of each cover. Leave the front handles intact but remove the knots, this helps the whole thing lie more flat.
- Use adhesive to adhere the bottom fold to the bag so it can't unfold.
- Cut 2 pieces of cardboard to be slightly smaller than the gift bag's height and width. It should be short enough not to interfere with the handles.
- Place the cardboard inside the bag.
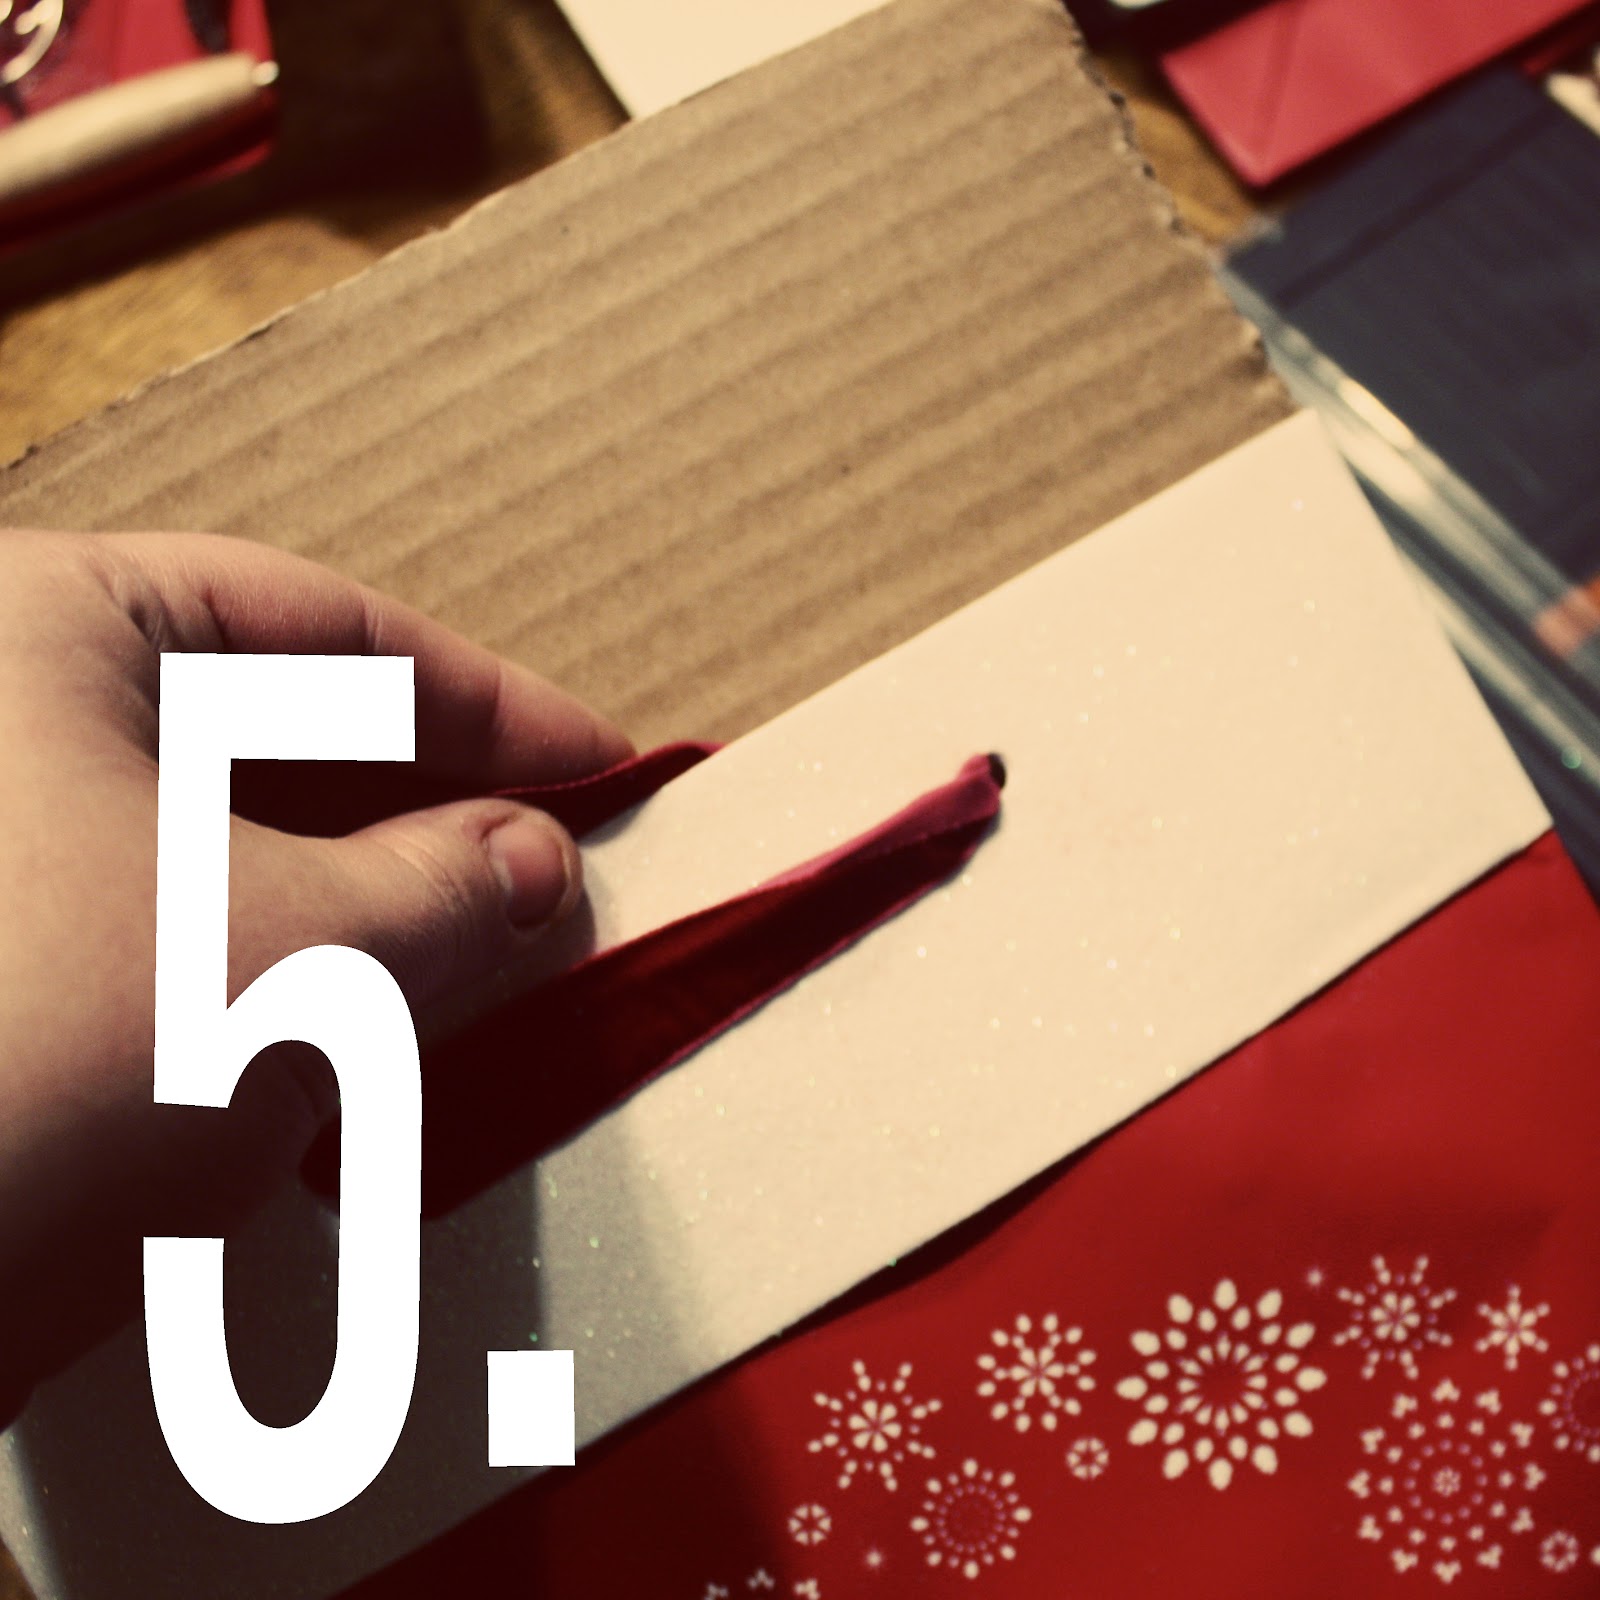
- Cut the tissue paper into 4 2.5 inch wide strips.
- Hand gather the tissue.
- Sew it into ruffled strips.
- Arrange handle ends so they will be caught by stitching when you sew the tops closed
- Place the tissue ruffles inside the mouth of the bag. Arrange the ruffles so they are spaced across the entire opening on each bag.
- Fix the ruffles so they are sticking out a uniform amount along the top.
- Sew the top closed on each cover.
- Stitching should be above the handles.
- Punch 3 evenly-spaced holes about 1/2 an inch from the edge on the binding side. Be sure the holes match up properly when then two covers are in position as the front and back of the album.
- Cut a piece of Kraft brown cardstock to cover the inside of the front cover. Punch the holes through it too.
- Put a good coat of adhesive on the folded side of a treat bag.
- Adhere it to the cardstock on the inside cover for a pocket.
- Tie a tag to the front handle for the album title with yarn/twine.
- Adhere a tag to the treat bag inside the front cover for journaling the pocket's contents.
- Create 4.5" X 6.5" pieces of cardstock with "Place Photo Here" in the center. I used Microsoft Word to make mine. This is optional but nice if you plan to give the album as a gift.
- Punch holes and add treat bag pockets to the back of 5 - 8.5x11 Kraft brown cardstock pages.
- Add journaling tags to each pocket.
- On the front side of each page create a simple decorative layout for one or two photo blocks. Include a tag for journaling.
- Make an additional page and adhere to the inside of the back cover. If this is a gift, include some inspiration and use ideas (below).
- Stamp a tag with your personalization stamp, "made by:" etc.
- Tie the tag to the handle on the back cover.
Put 3 book rings through the 3 holes and you have your album!
{Ideas}
Keepsake Christmas Album:
Add your family name or other desired title to the front tag, Place favorite Christmas photos in the photo blanks, write captions on the photo-tags, add Christmas memorabilia to the pockets and catalog what you put in there on the pocket-tags.
Holiday Card Keeper Album:
Add family name or other desired title to the front tag, Each year: Add the Christmas card you send out to people to the photo blank and the year you sent it to the photo-tag, Put the cards you receive that year in the pocket and title it with the year too.
Season’s Recipe Album:
Add family name or other desired title to front tag, Add photos of you or family members preparing/eating your favorite Christmas recipes or pictures of the foods themselves, add captions telling about your photos, put a copy of the recipe in the pocket and add the dish name to the pocket-tag.
Keep it and fill it up with your memories or give it to someone special.

I played Santa and took one to each of Bee and T-boy's teachers the last day before Christmas vacation began. There was smiles all around.
The only thing that beats the joy of crafting is the joy of giving!
Love,
The Prairie Hen in NE
P.S. Please feel free to shoot me any questions if you have trouble following the instructions.
I was thinking the other day, one of my most precious gifts was the one you made me! You are SOOOO talents...wish I had an ounce of your creative gene. What an awesome gift to give to the teachers! I won't tell you what I gave Kinzies. ;-)
ReplyDeleteAmazing girl! Not only what you did, but that you managed to get the pictures/instructions of the project all together too!
ReplyDeleteDear In the bag, er Album,
ReplyDeletelooks like you had another fun time crafting. Lucky teachers, I bet they loved them!
love,
Winter crafts
in
NE
I'm slightly confused, do you use the treat bags to put lots of your photos in?
ReplyDeleteThere is a treat bag attached to the back of each page... they can be used for extra pictures, recipes, cards, memorbilia.
ReplyDeleteLet me know if you have more questions.
Love,
R